This post may contain affiliate links. Please see our disclosure policy.
Electric pressure canners were first released in 2020, and they make pressure canning simple for beginning canners. The canner does almost everything, and all you have to do is load the food and wait.
Pressure canning can be intimidating, especially for beginners. I remember the first time I turned on my big stovetop pressure canner; I was on pins and needles the whole time it was running, worried it might blow up.
Now that I’ve been canning for more than a decade, I’m familiar with every step of the process, and it’s down to a quick routine. Still, it took a long time for it to get that way, and I often forgot steps along the way.
My husband still reminds me about the time when we started the canner with the caning weight inside the canner…and when the canner came up to temperature, we spent 10 minutes frantically looking for it…before cooling the canner and carefully unloading it and starting all over again.
When the instant pot was released in 2010, the world fell in love with pressure cooking. It was all effortless, and that little countertop machine can cook just about everything at the press of a button.
Unfortunately, while the instant pot is a pressure cooker, it’s not a pressure canner. (Here is why canning in the instant pot doesn’t work.)
The main reason is that it doesn’t maintain the precise temperatures required for pressure canning, and it doesn’t vent the chamber before cooking to ensure even processing. Sadly, you cannot pressure an in an instant pot.
However, to the delight of canners everywhere, there is now an automatic digital pressure canner that was just released by Presto! It works more or less exactly like an instant pot, with everything at the press of a button…but it has the added bonus of accurately maintaining ideal canning pressures automatically.
It prompts you for every step in the canning process, meaning you can’t forget anything, and then maintains the pressure all on its own, without any fuss.
I’m a passionate home canner; believe it or not, I actually own already own three different pressure canners. I put up food multiple times a week for my family, amounting to over 1,000 jars a year, so I’m definitely not a beginner…and I’m in love.
This canner is going to completely revolutionize home canning, and introduce food preservation to a whole new generation.
Pros and Cons of Electric Pressure Canners
You can read my full review of the Presto Digital Pressure Canner for more details, but here are the main pros and cons:
Pros
- Doesn’t use stovetop space
- Runs automatically, so you can’t forget a step
- Maintains accurate pressure automatically
- No altitude adjustments!
- Silent running (no pressure jiggler valve)
- Multiple fail-safes to prevent accidents
- Well insulated, so it doesn’t heat up the house while canning
- Easy to use, like instant pot
- Not Scarry
Cons
- Limited capacity (5 quarts or 8 pints)
- Beeps at Each Step
- Takes a Long Time to Cool Down (because it’s well-insulated)
Types of Electic Pressure Canners
I was hoping to compare several different electric pressure canners and walk you through how each one works…but after exhaustive research, I learned that there are only two on the market that meet USDA pressure canning guidelines. I bought both the Nesco/Carey Digital Pressure Cooker and Canner as well as the Presto Precise Digital Pressure Canner and I’ve been putting them both through their paces.
The Presto model works great, and I was able get a home pressure canning batch kicked off just minutes after I opened the box. It’s easy to use and I love it.
The problem is, I’m having a lot of trouble with my Carey/Nesco canner and it’s much less automatic. Several times already I’ve managed to hit the wrong button and start the canning timer…even when it’s not yet up to pressure. Once you do that, there’s no way to stop the process and you’ll have to let it run and then re-process the jars AGAIN. In the interest of getting something out there, I’m only going to be discussing the Presto because using it is straightforward and pretty much foolproof.
Once I get a better handle on using the Carey/Nesco, I’ll put out a full review of that model and update these instructions. At this point, I don’t recommend the Carey/Nesco because of the potential for human error in processing.
There are others that are “electric canners,” but they’re all only approved for water bath canning.
That includes the Instant Pot Max, as well as the Nesco Digital Pressure Cooker and Canner. Both are pressure cookers, but they are not pressure canners, and their canning settings can only be used for water bath canning. The manufacturers of both models bury this information in the fine print of their websites, and their marketing is a bit misleading.
I was sorely disappointed, but it does make it a lot easier to explain how an electric pressure canner works if I’m only talking about one model.
All American also makes an electric autoclave that looks very similar to their stovetop pressure canner, but it won’t work for canning. The inside is set up a bit differently than a canner, since it’s not actually designed for canning jars. It’s locked to 17 psi, so that’s much higher than you’d want to use for pressure canning food anyway. It really is only for industrial sterilization.
(It’s also around $1200, so it’s not exactly a more economical option anyway.)
Ball canning also has an electric canner, but it’s a simple water bath canner, and it’s just a basic heating element incorporated into a pot. It’s more or less an expensive electric kettle, and it’s just that a pot rather than a kettle. It obviously can only be used for water bath canning, not pressure canning.
How to Use an Electric Pressure Canner
Electric pressure canners can actually be surprisingly easy to use, and the Presto model prompts you every step of the way.
Presto has a quick 6-minute video that walks you through the process of using the canner, and if you learn best from videos, you can see that below (but I’ll also take you through everything step by step).
To use an electric pressure canner, you start by placing it on a stable surface near an outlet. Next, give it a quick once over to make sure everything is in place, and no parts are broken or missing.
Plug in the canner and add in the inner pot along with the canning trivet.

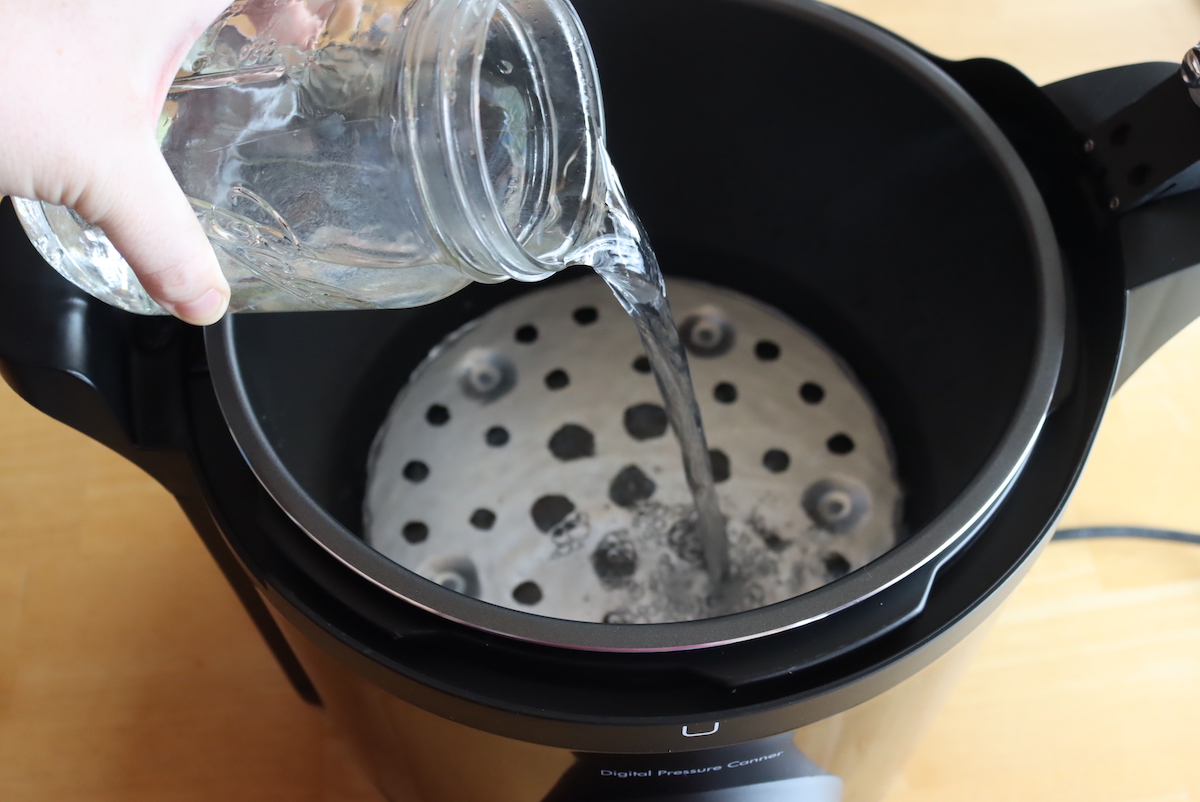
Next, you’ll want to add 3 quarts of water to the canner. You’re not filling it all the way, just adding enough water to allow the inner chamber to fill with steam.
There’s a convenient fill line inside the canner right at the 3-quart mark, making it simple to know how much water to use.
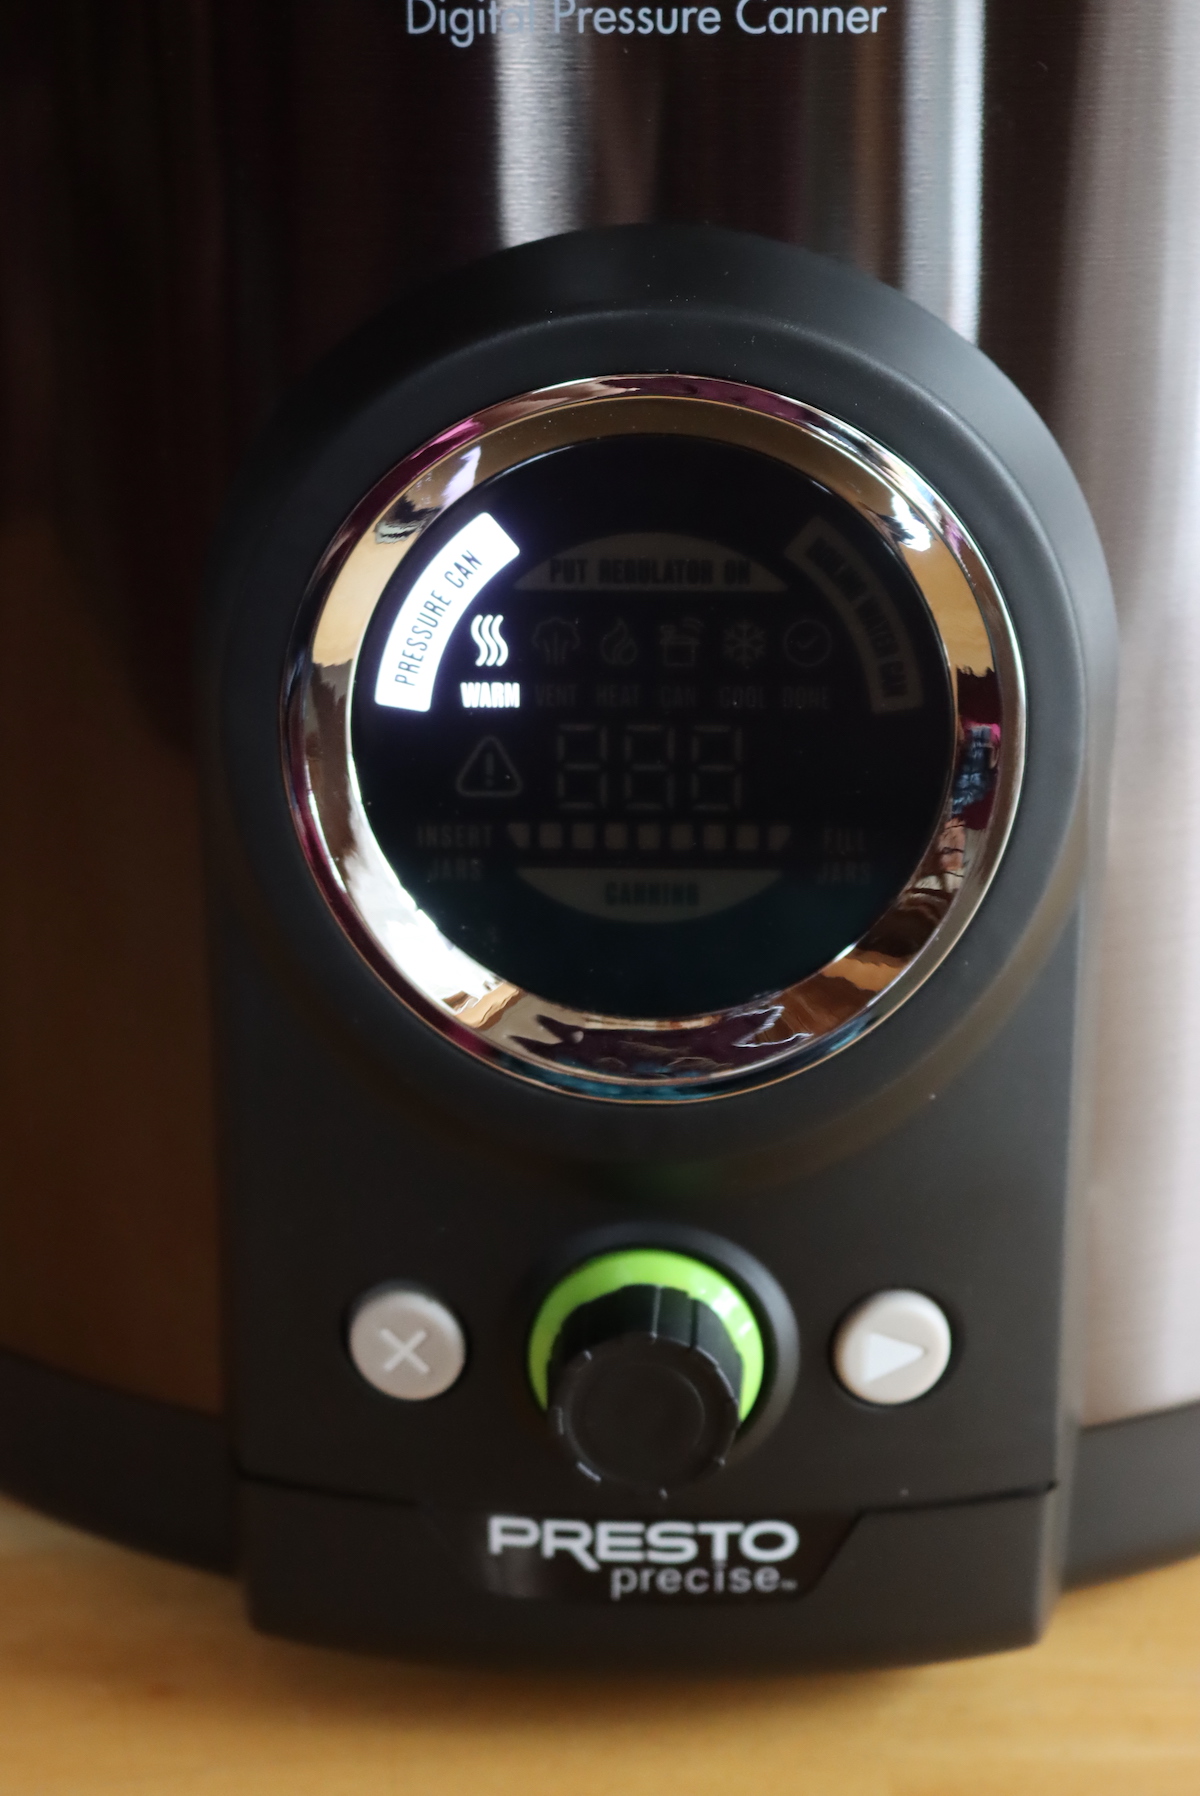
Once you’ve added water, turn on the canner and select “pressure canning.” You can also choose water bath canning, and I’ll go through that separately.
The canner will prompt you to set the total canning time. This will depend on the recipe you’re using, and you can choose between 10 minutes and 180 minutes. Most recipes range between 20 and 100 minutes, but you should refer to a tested pressure canning recipe for specifics.
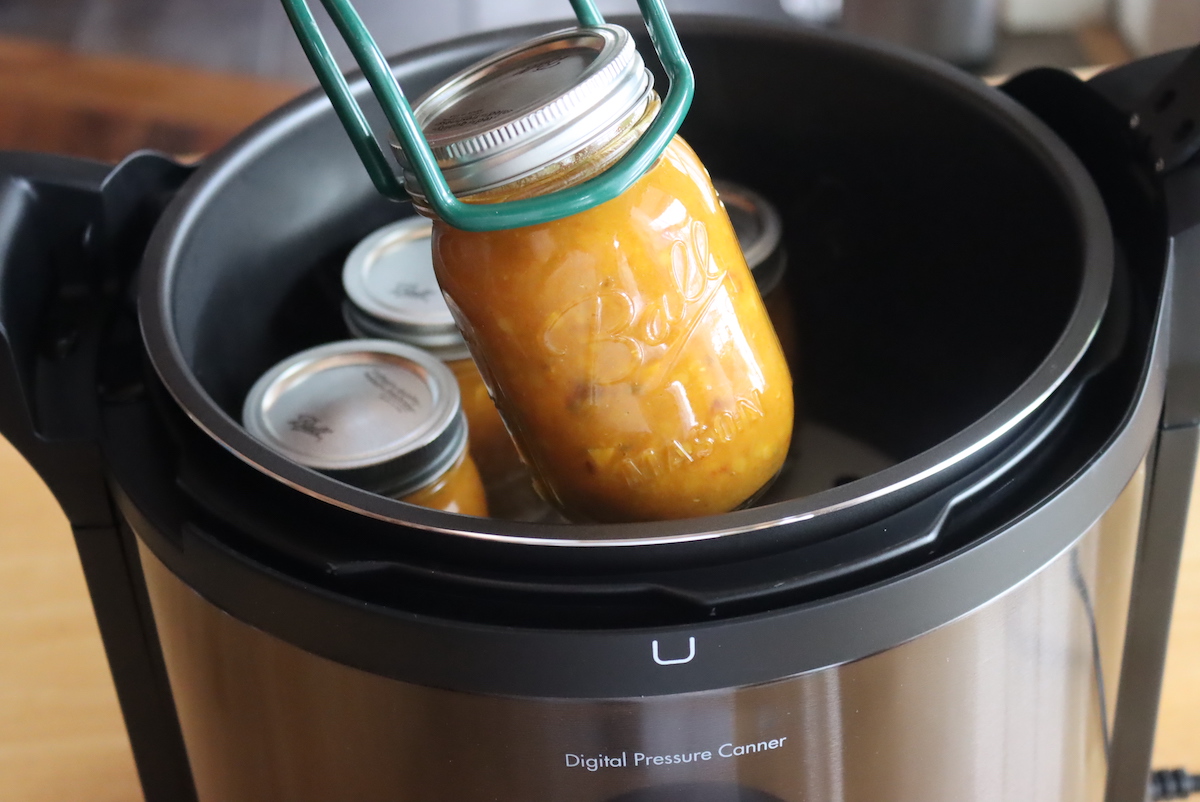
Once you’ve set the canning time, it’ll prompt you to place the jars in the canner to pre-warm them. This also pre-warms the canner, so you can’t skip this step.
If you tend to pre-warm your jars (and clean them at the same time) by running them through the dishwasher, then you can still do that; just allow the canner to pre-warm without the jars inside.
Once the jars are pre-warmed, the canner will prompt you to fill the jars with your prepared food. This is where you follow the recipe and fill the jars with hot food, leaving the correct headspace the recipe specifies, and then cap with 2 part canning lids to finger tight.
Load the jars into the canner when prompted by the electric pressure canner.
After you load the jars, place the lid on the canner and seal it shut. You’re not going to put the pressure regular on yet, just lock it shut using the latch.
This will allow the canner to come up to boiling, but you’ll be venting the canner before you put on the pressure regulator.

Once the canner is latched, press the advance button, and the canner will begin heating the contents to boiling to that it can vent steam.
This should take about 5 to 15 minutes, depending on how hot everything was when it went into the canner.
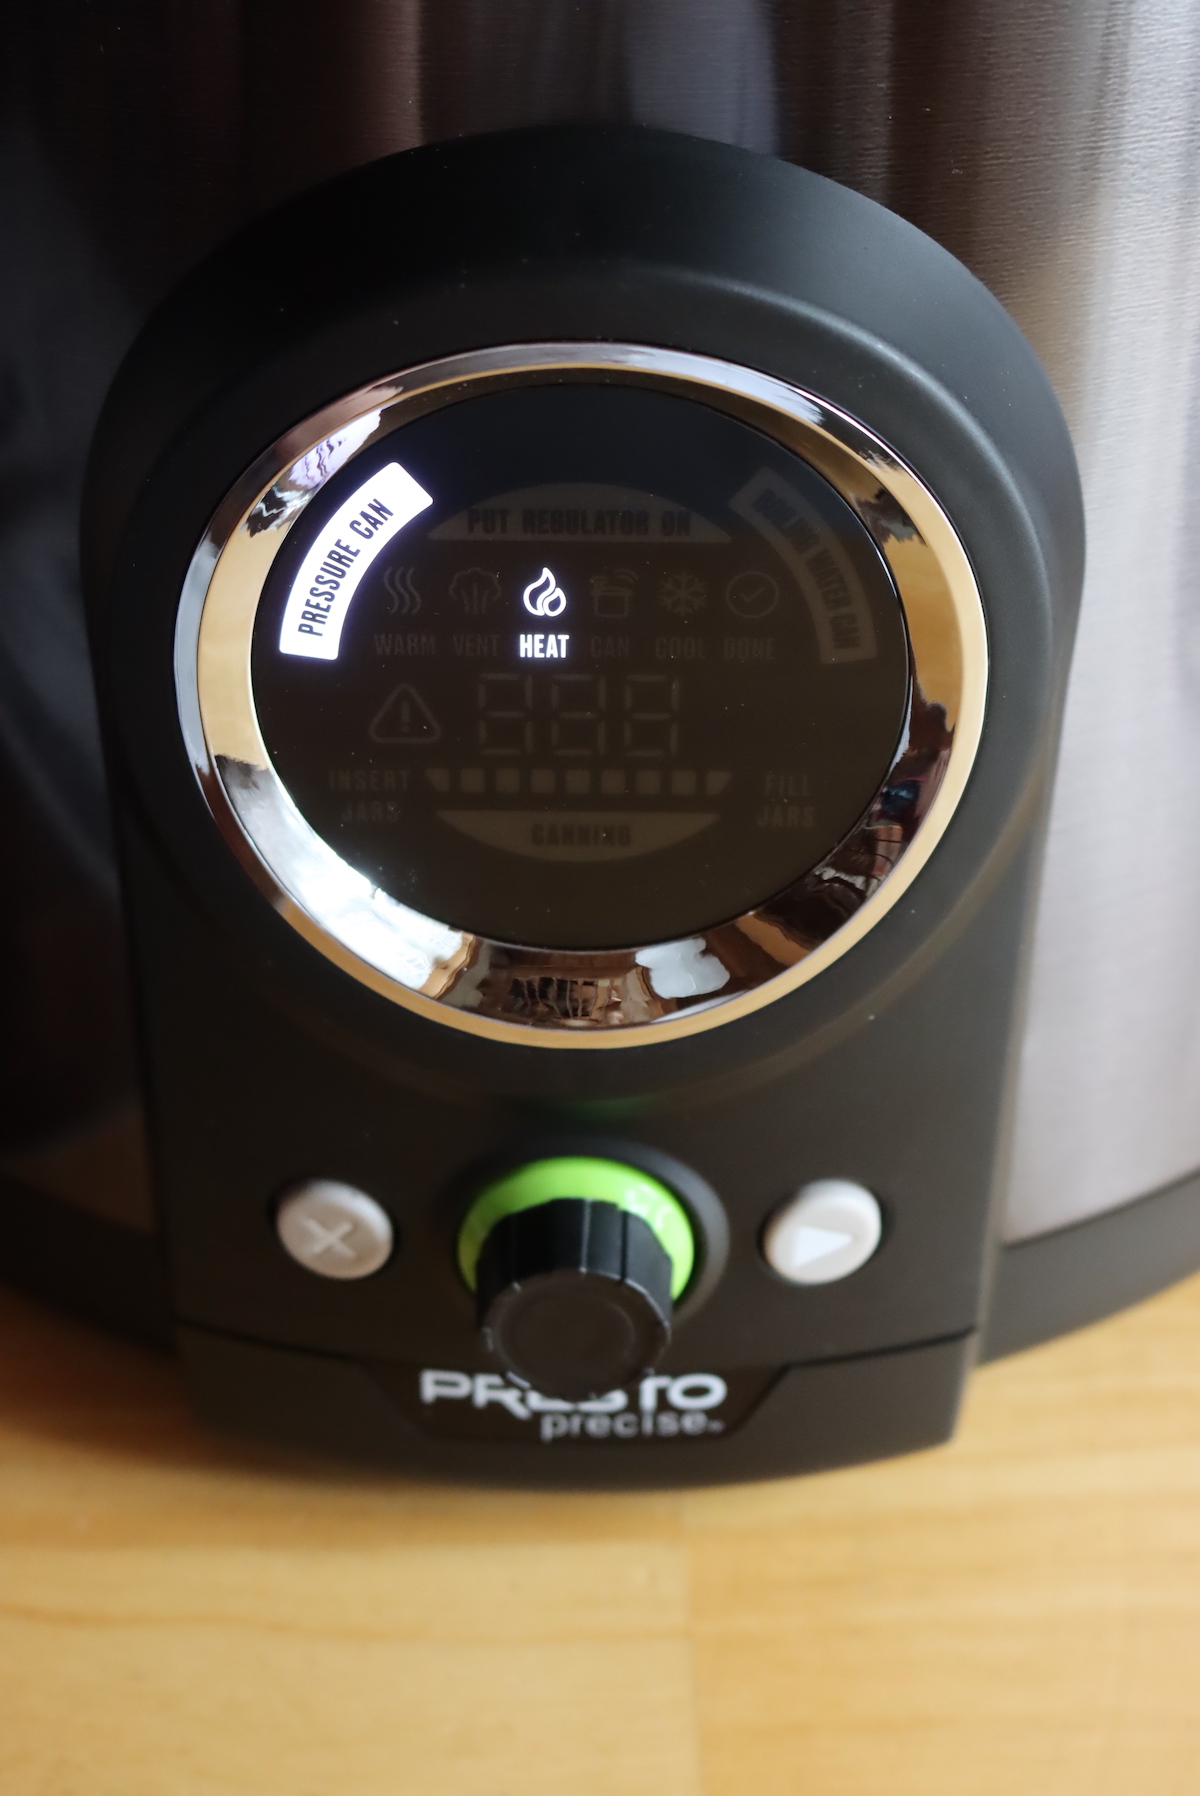
Once everything is boiling, the canner will show “venting,” and it’ll count down for 10 minutes.
Steam will be filling the chamber, to allow for even processing.

When venting is over, the canner will prompt you to put on the pressure regulator and turn it to “canning” so that the canner can come up to pressure.
Pressure is not yet building in the canner when the canner is “venting.”
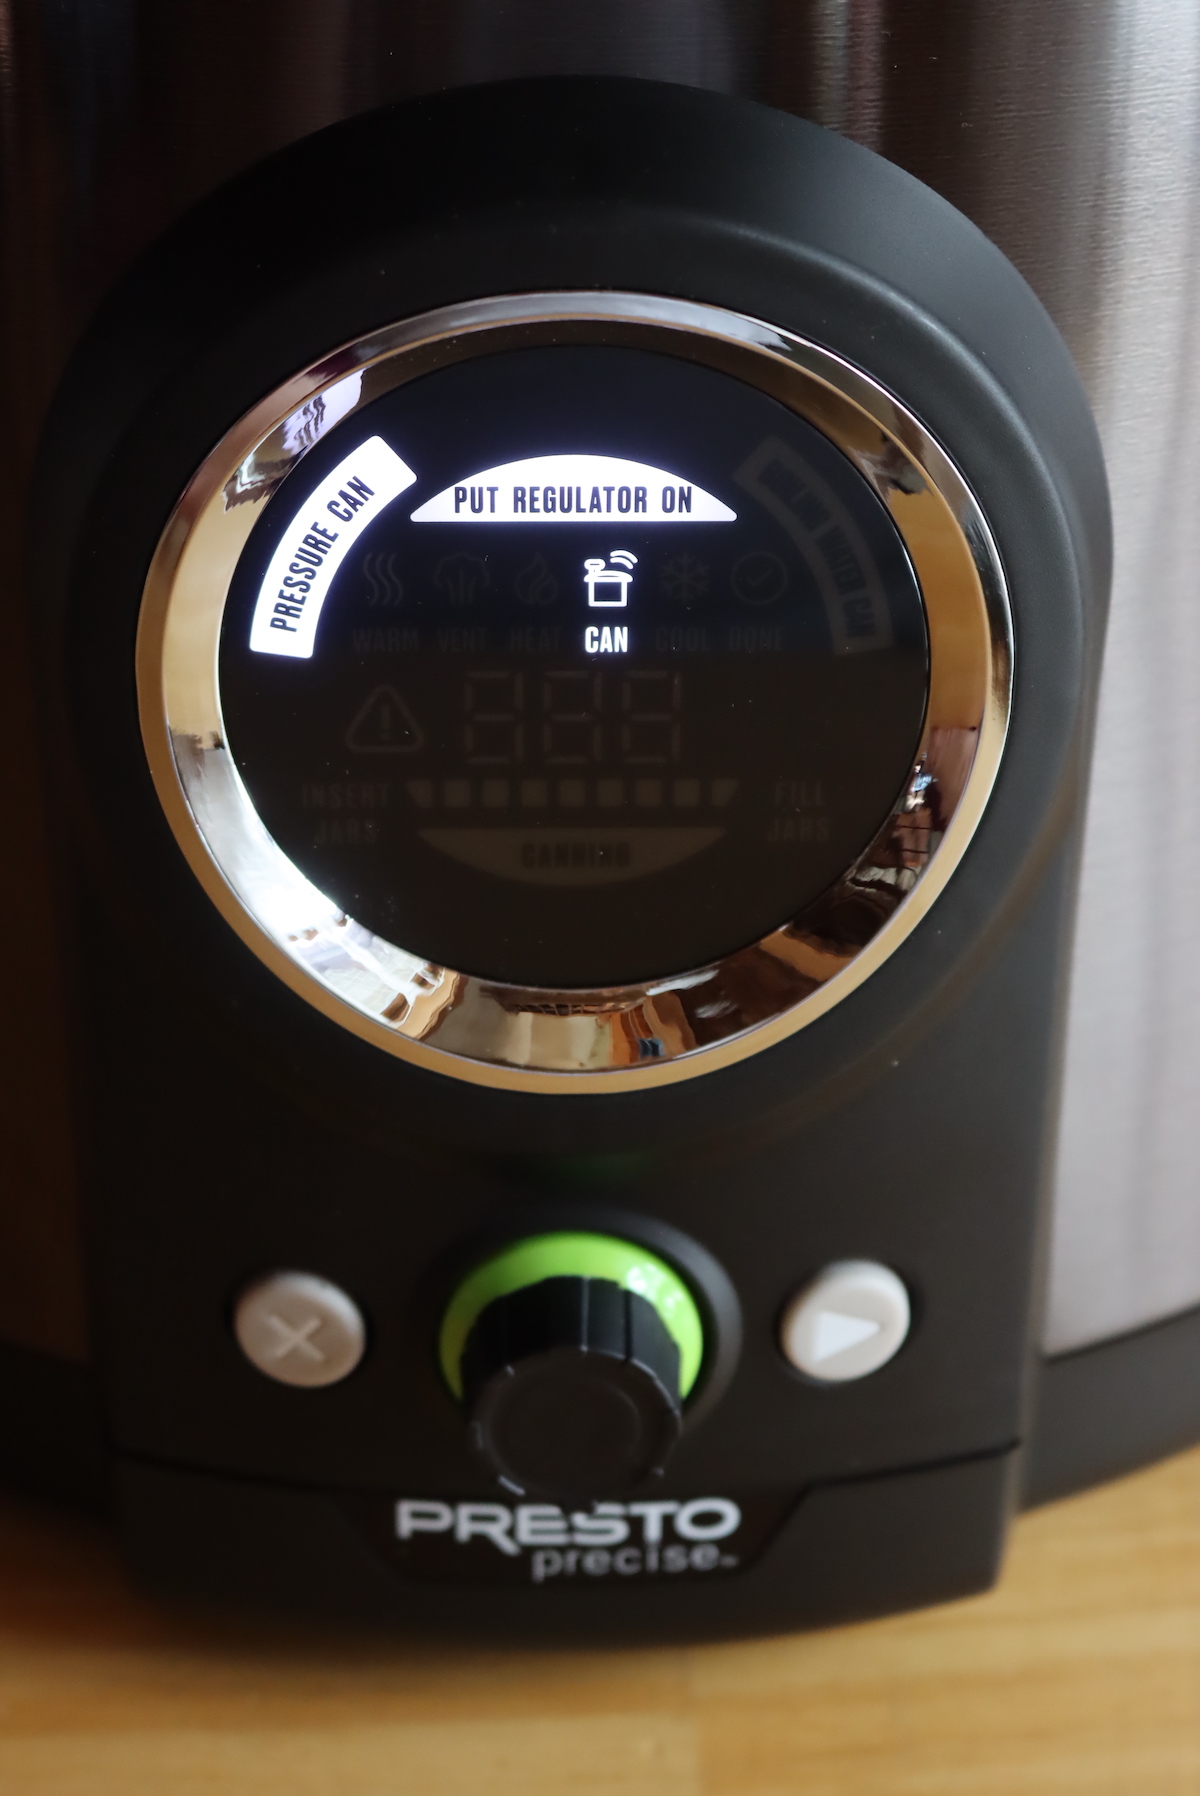
At this point, you’re going to take the pressure regulator and place it on the steam vent.
It will snap neatly onto the steam valve.
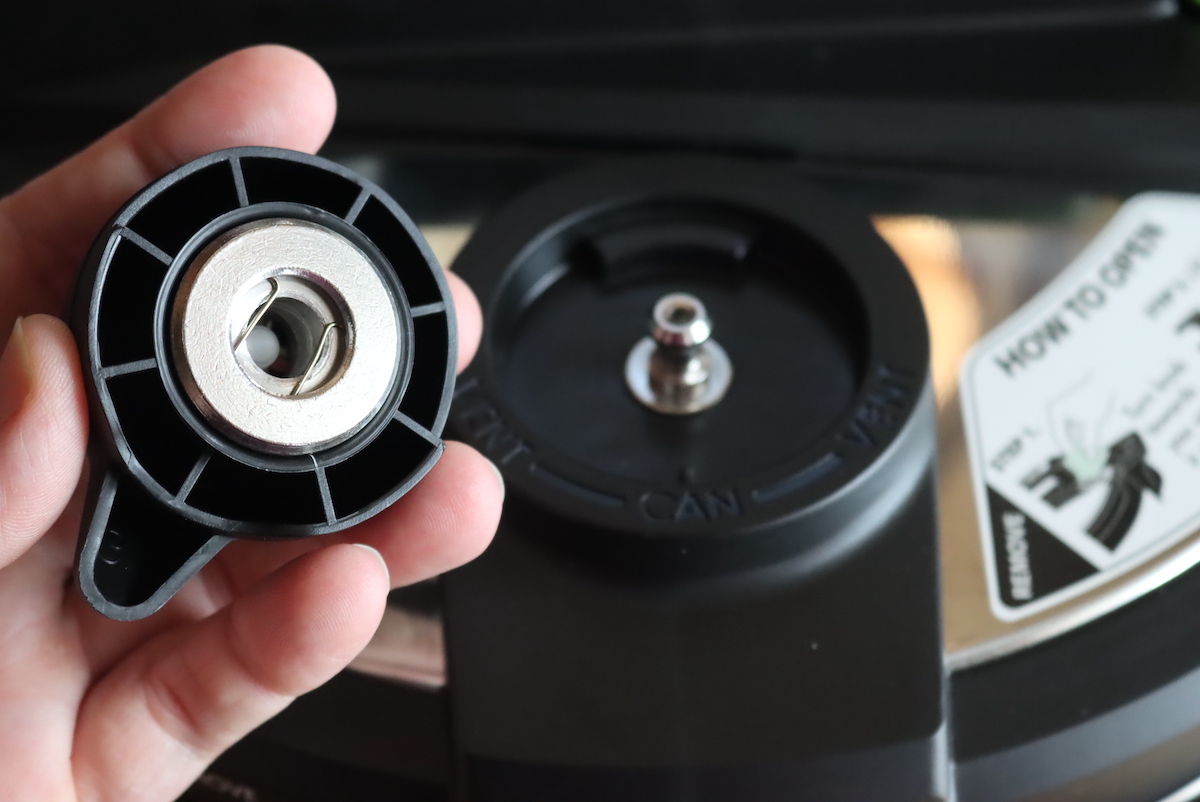
Make sure it’s aligned for “canning” rather than venting.
(It’s clearly labeled, and the indicator should be pointing toward the front.)

When the pressure valve is in place, press advance, and the canner will start coming up to pressure.
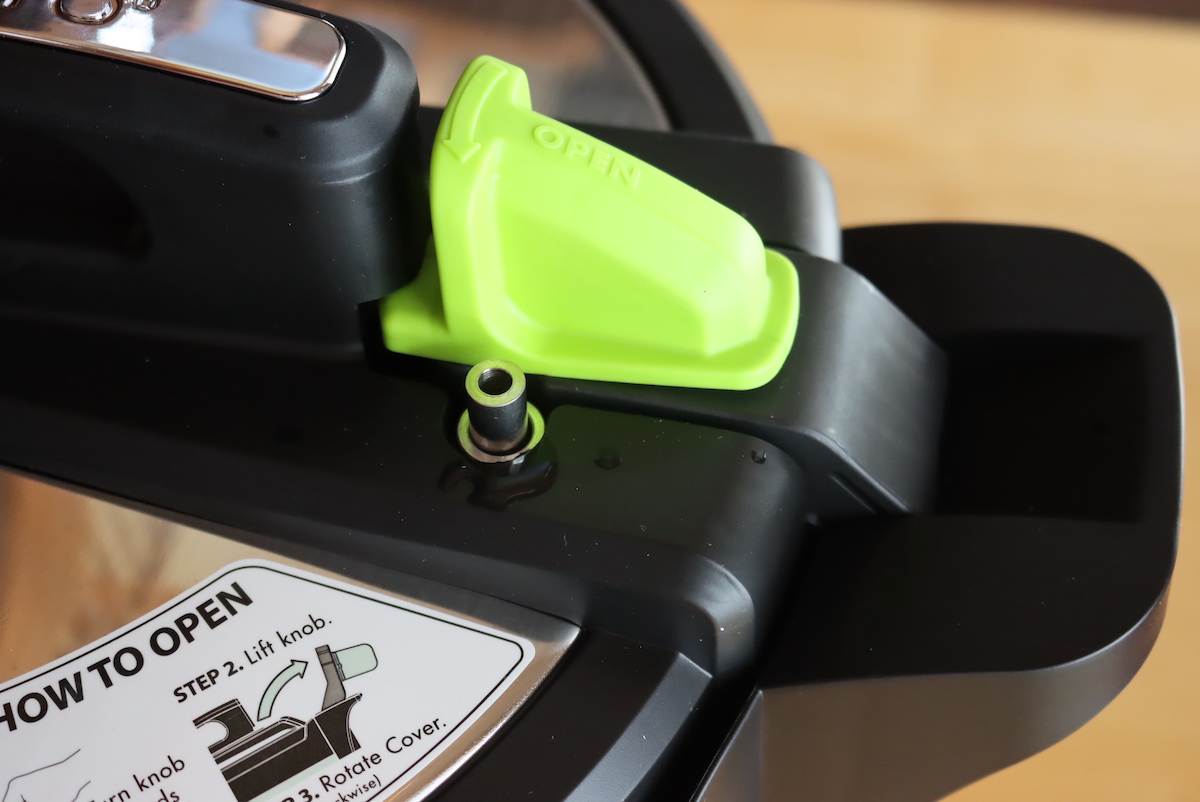
As the canner comes up to pressure, there are extra locks that will turn on to prevent you from opening the canner accidentally when it’s at pressure. There’s a little metal lock that pops up next to the latch, and that happens when there’s pressure inside the chamber.
The lock itself physically prevents you from opening a pressurized canner, which is a nice safety feature.
This time coming up to pressure is important, but the food is not processing yet. The processing timer won’t start until the canner is at the proper pressure for processing the food.
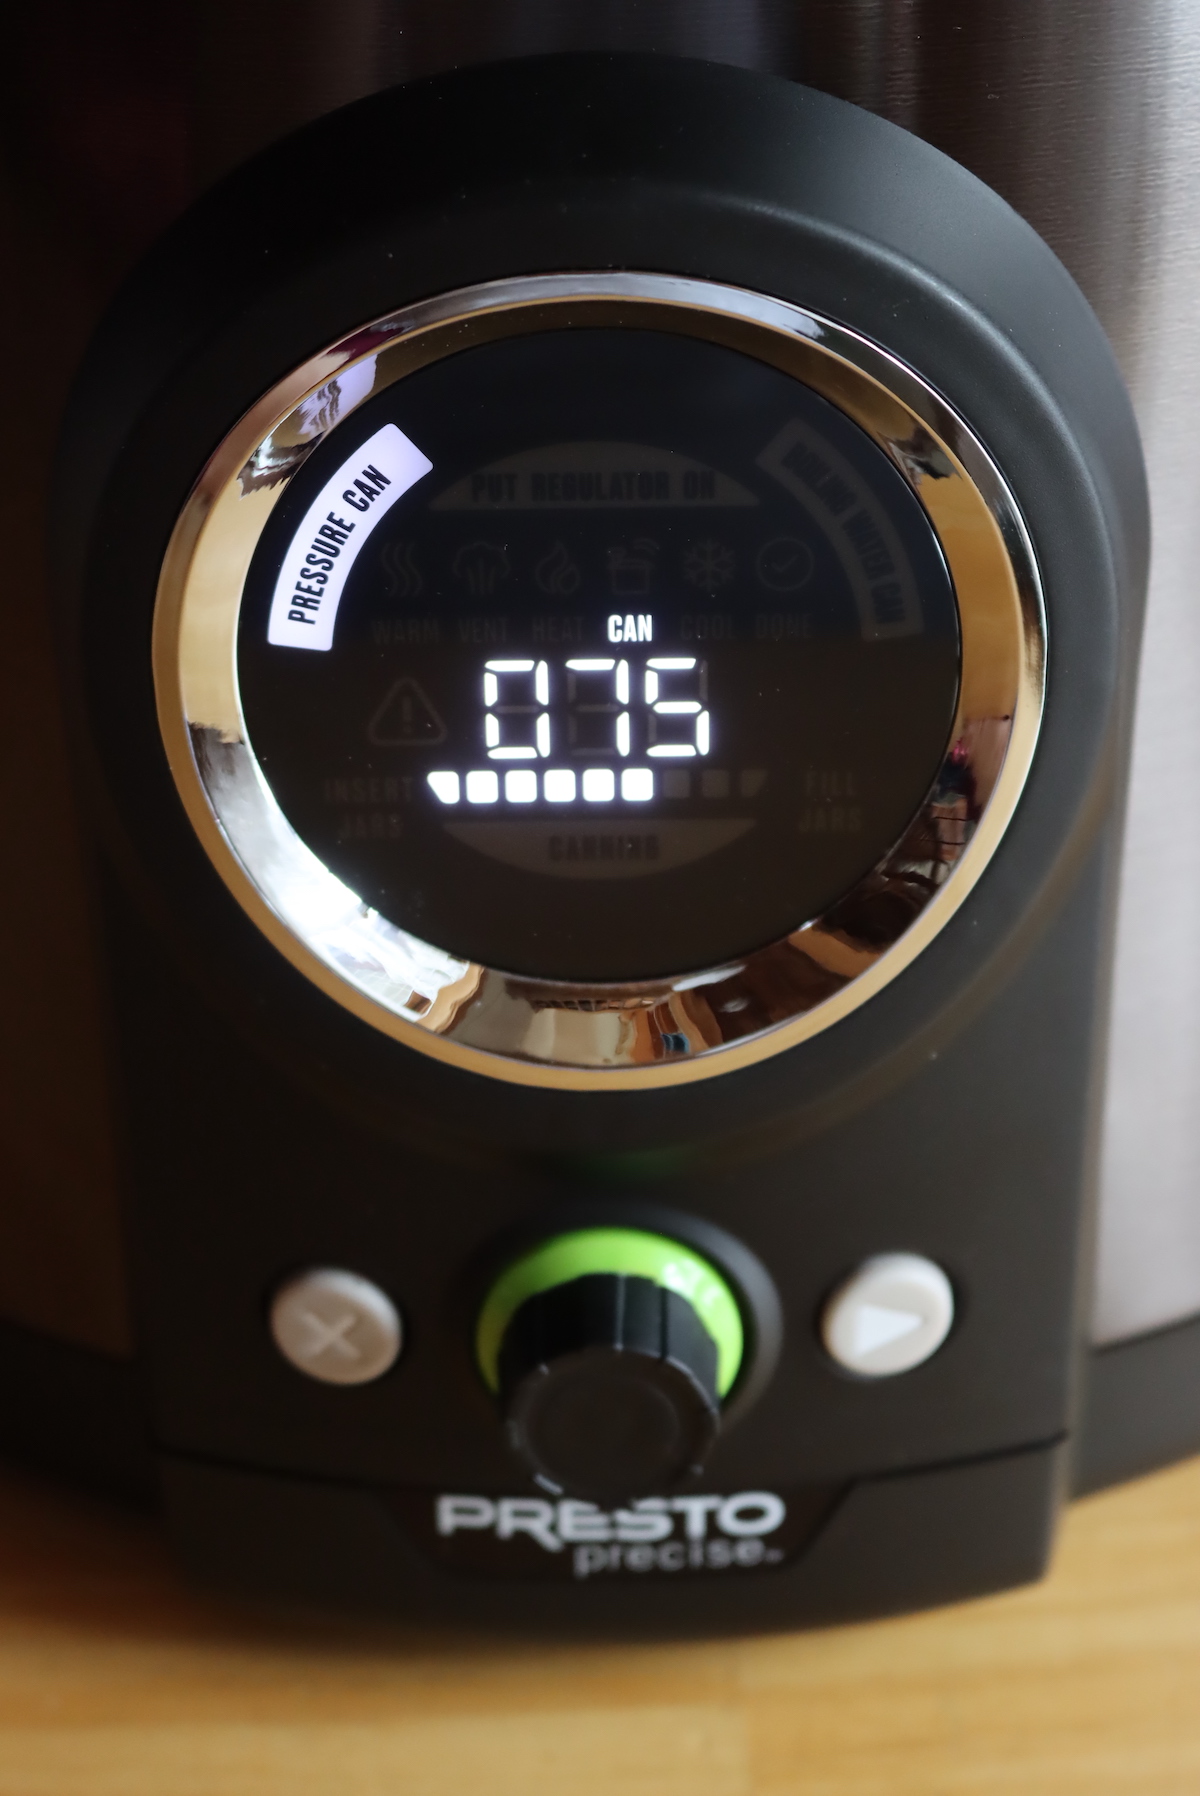
Once the canner is up to temperature, the screen will display a countdown timer that shows you how much processing time is left.
This will depend on your canning recipe.
Since the canner automatically adjusts for altitude, you know that the food is properly processed at the correct pressure regardless of where you live. The only thing you need to set is the total processing time from the recipe.
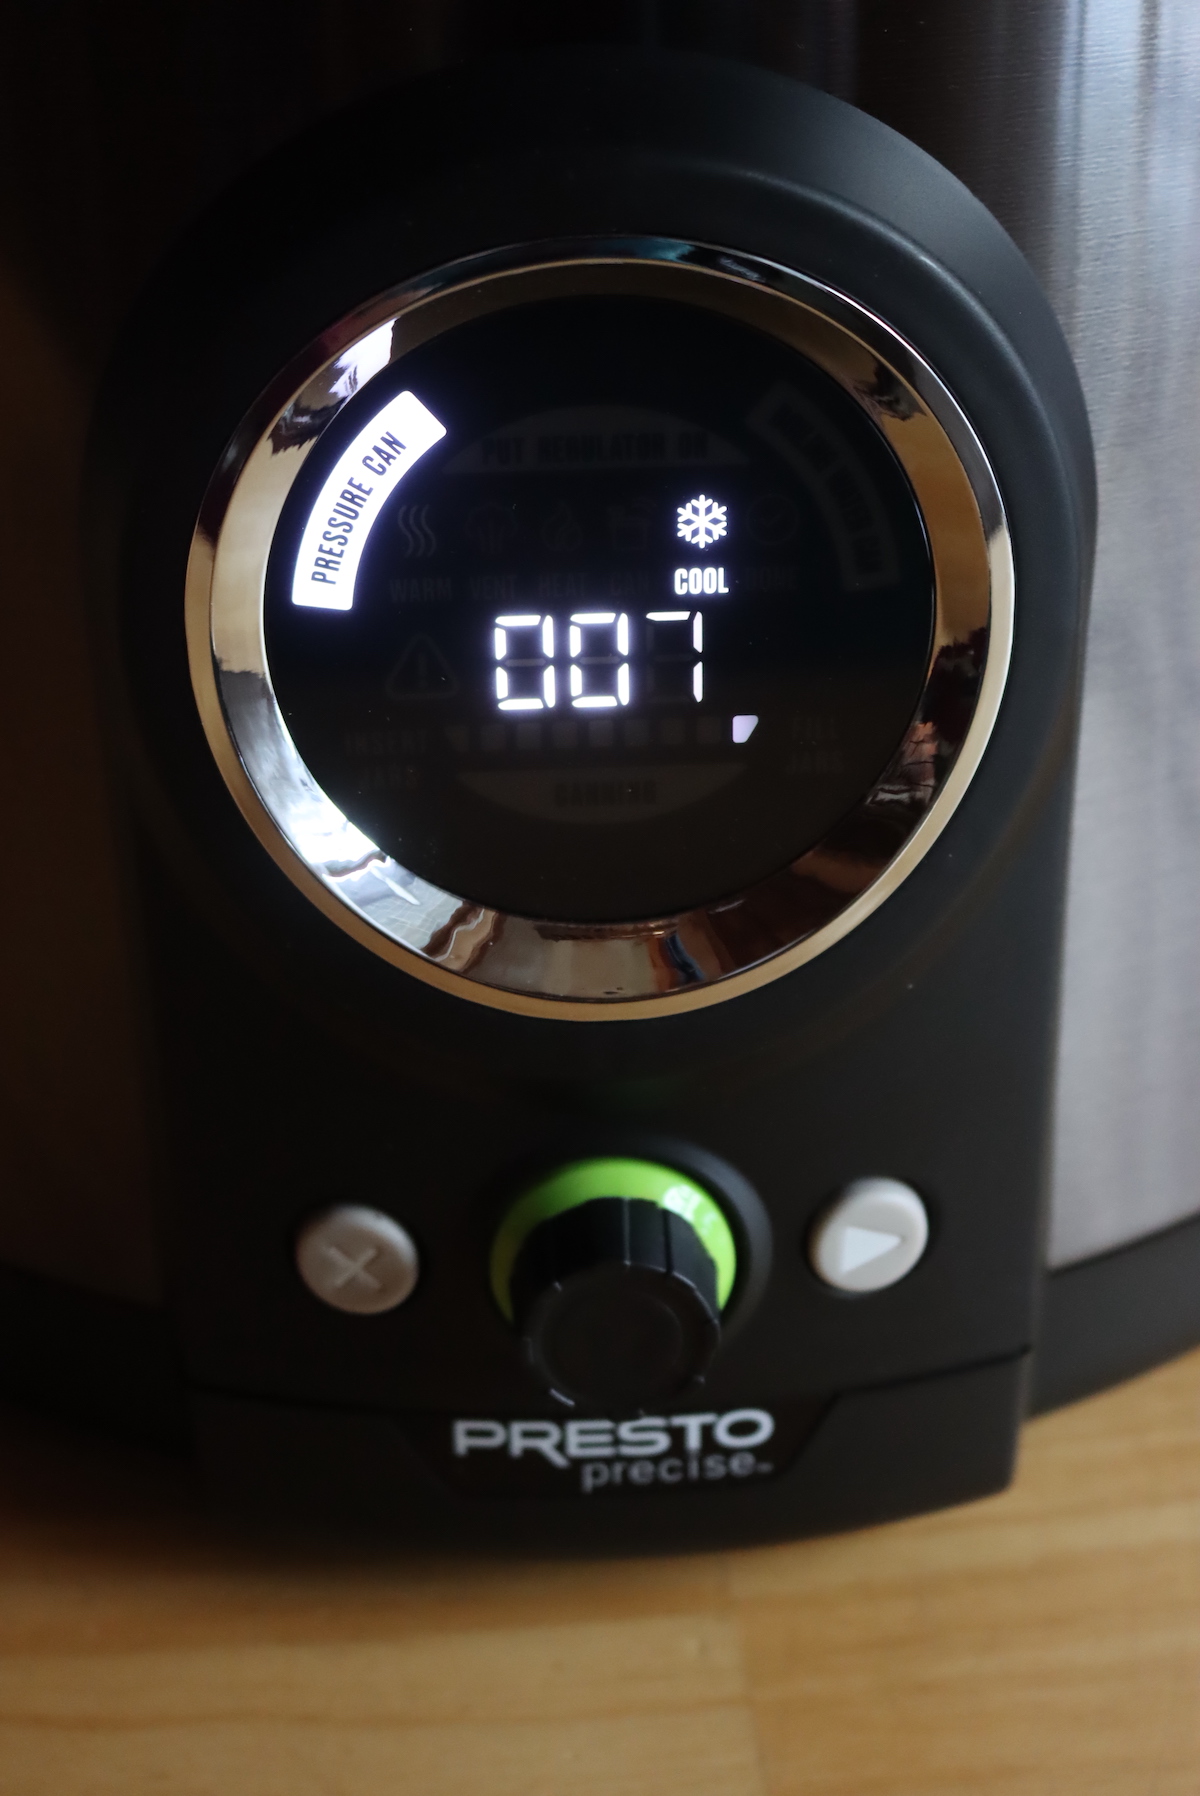
Once the canner finishes processing, it’ll display a “cooling” screen.
The canner will slowly come back down to zero pressure. This could take anywhere between 45 and 90 minutes.
When there are about 10 minutes left in the cooling process, it’ll show a countdown timer.
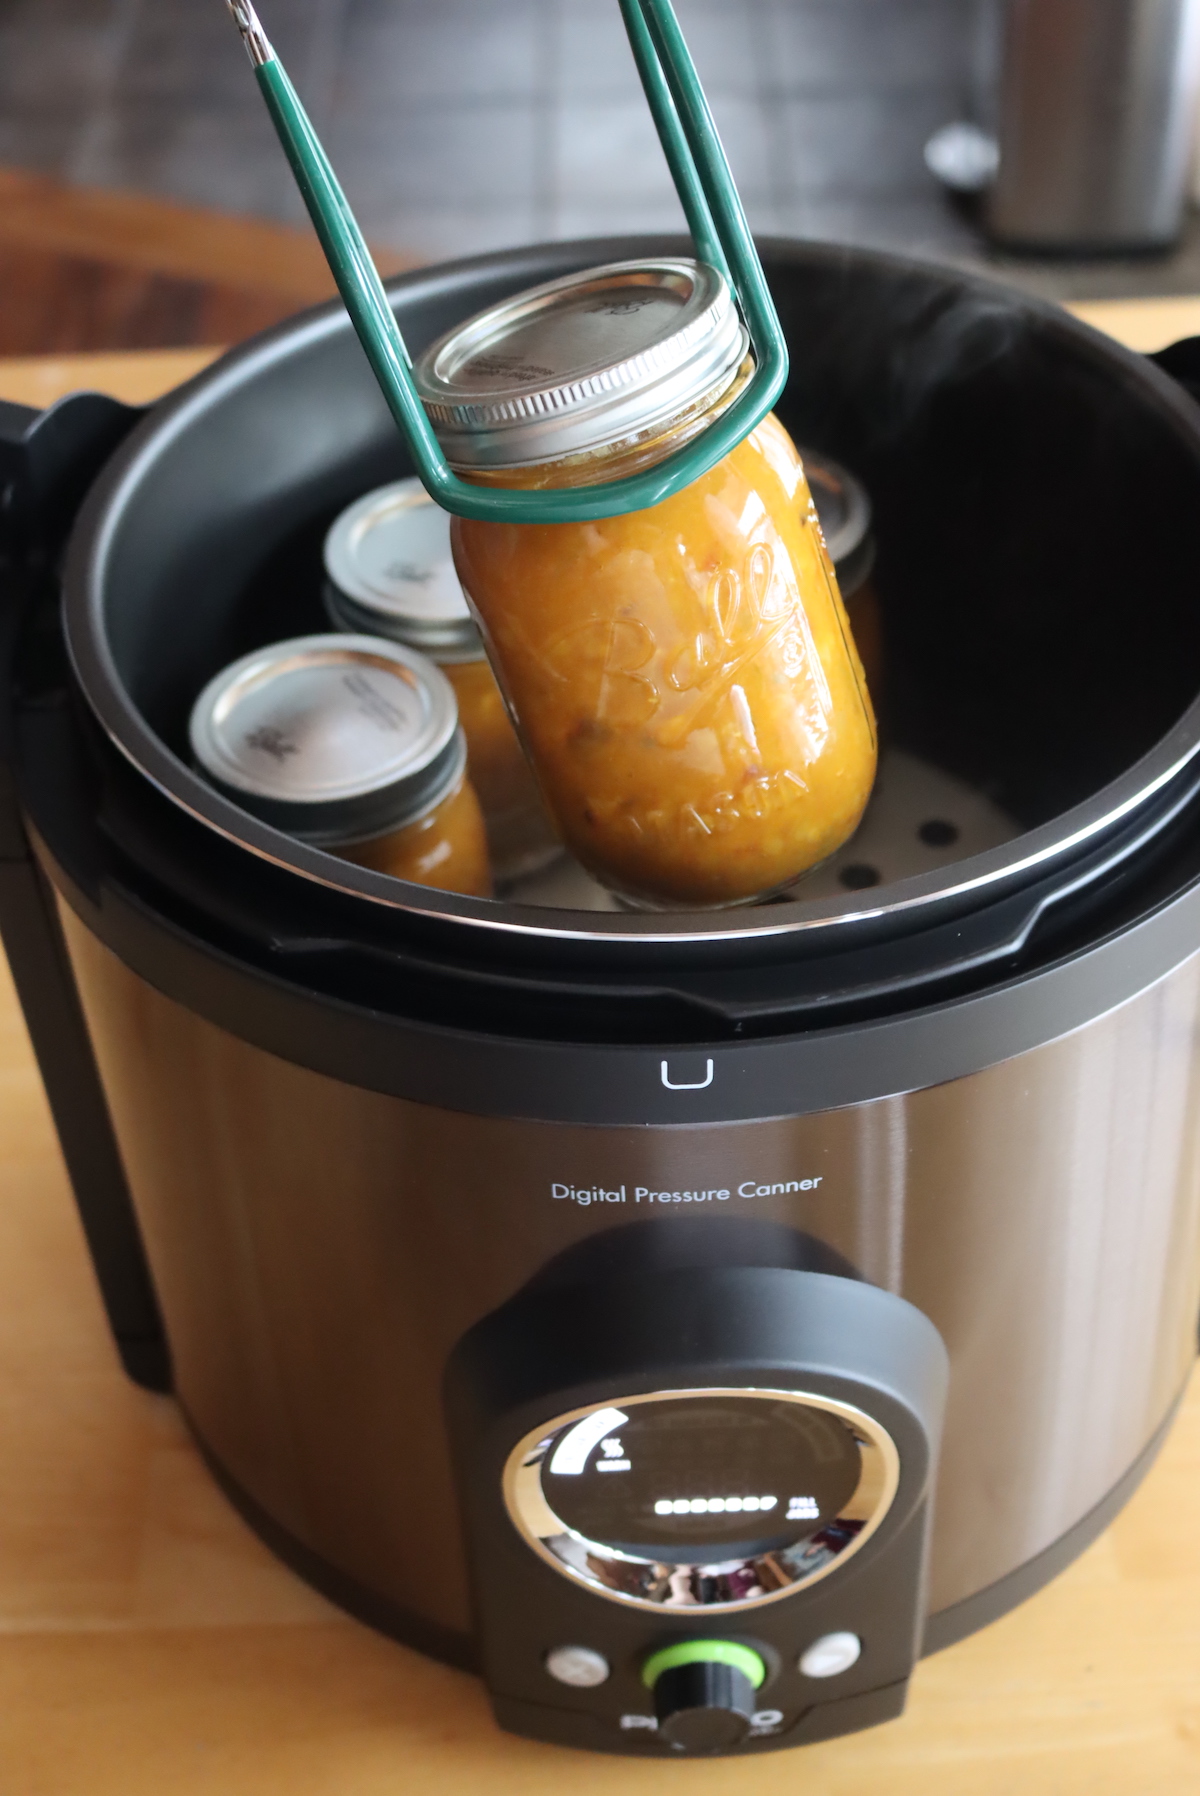
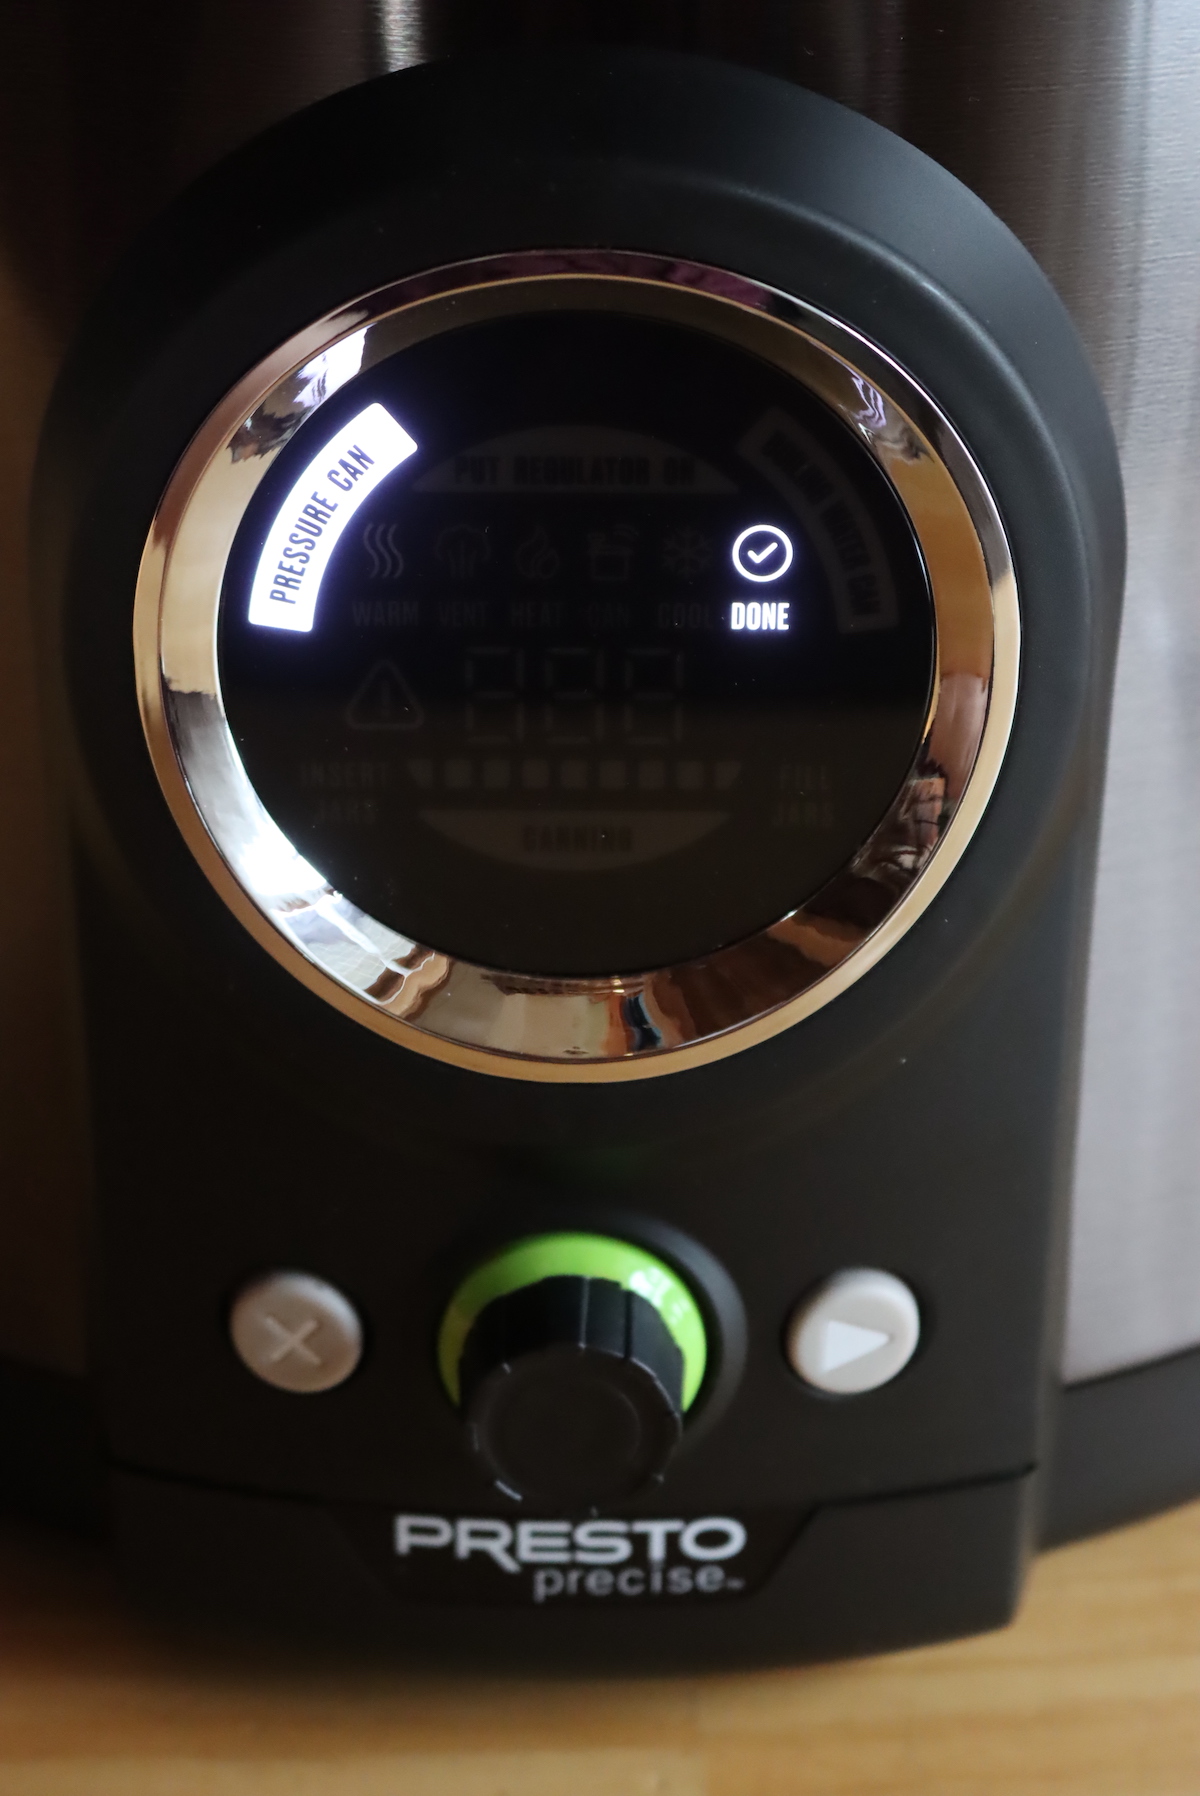
Once the chamber has cooled, the lock will release, and the screen will display “done.”
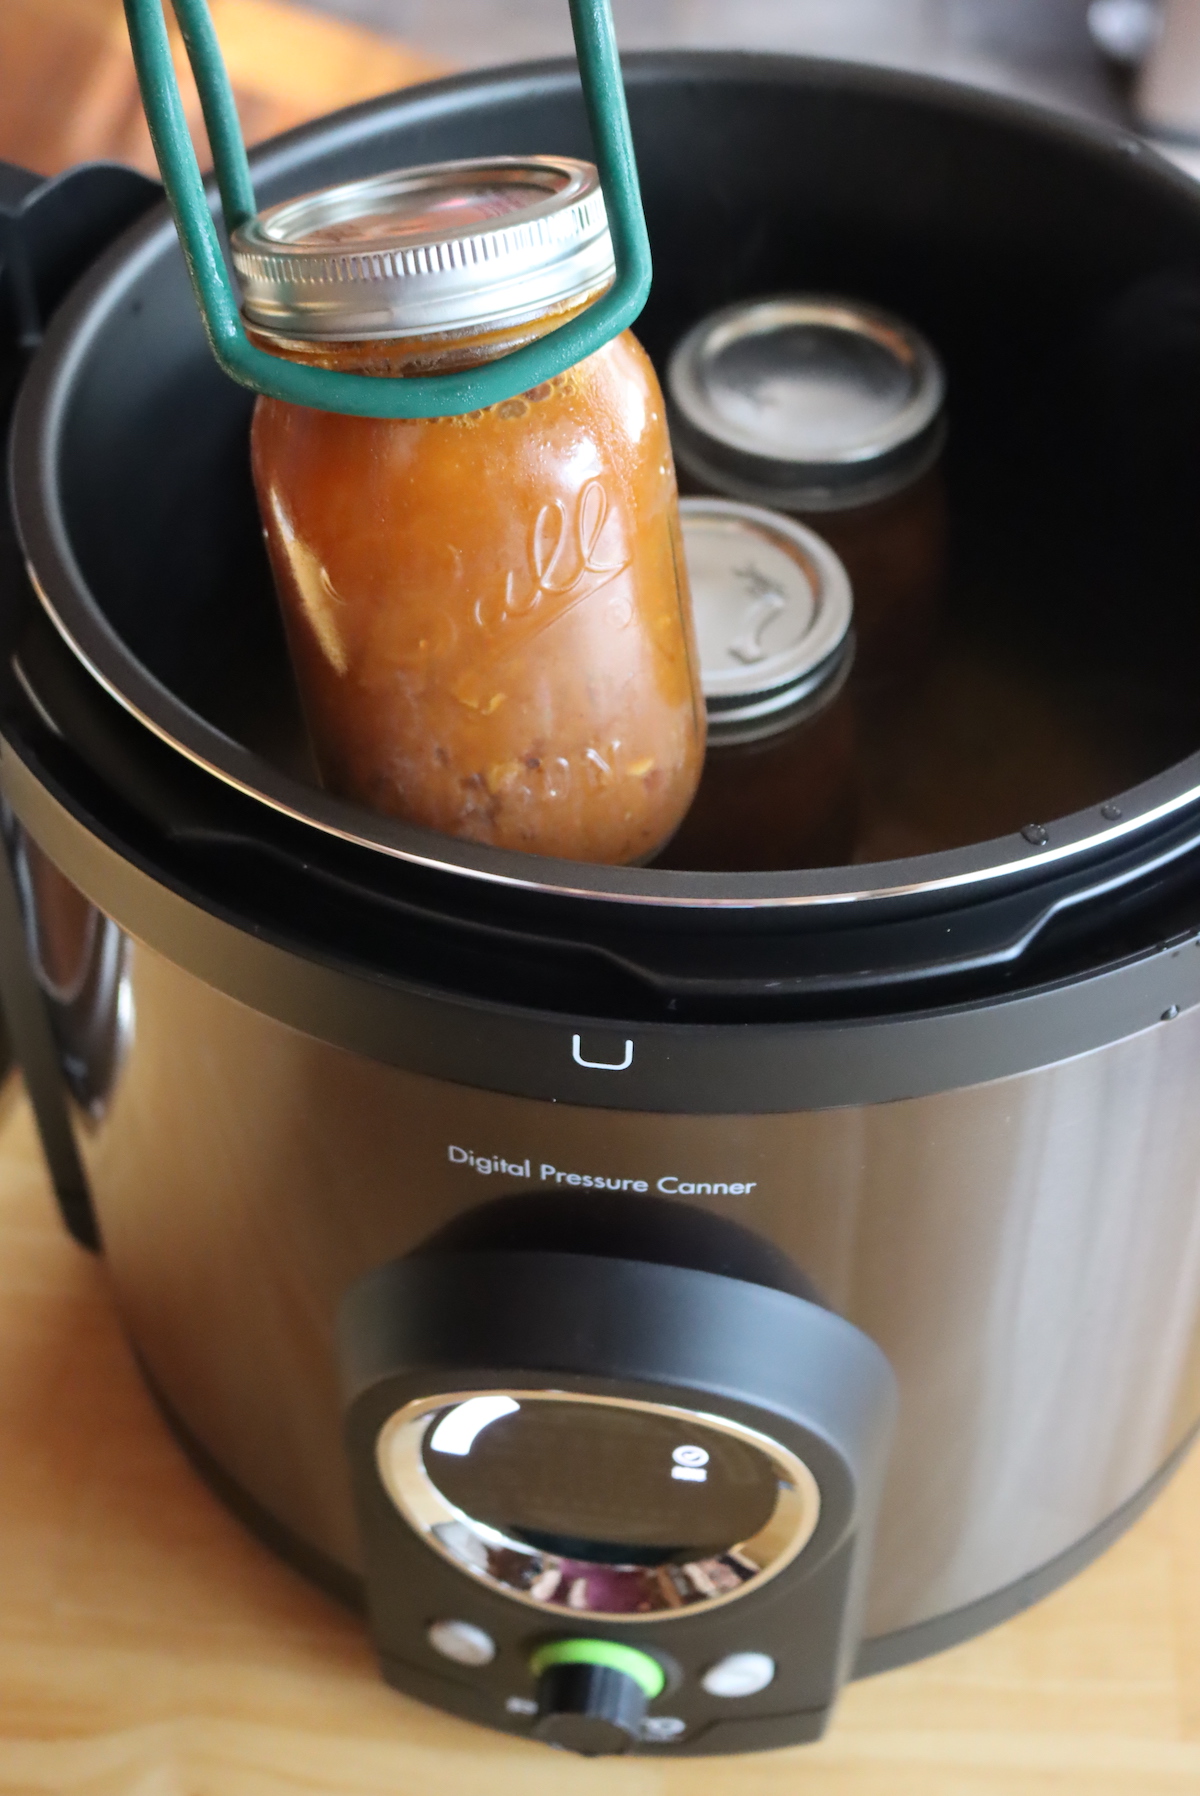
Be aware that it’s still boiling hot inside the canner; it’s just not under pressure. The contents aren’t actually “cool,” they’re just no longer at pressure, so you’ll still need to remove everything with a canning jar lifter.
You can leave the jars in there as long as you like, or you can remove them promptly; it’s up to you.
Either way, allow the jars to cool completely and then check the seals.
This is just like regular canning on the stovetop, and you do still need to check the seals. The jars can have sealing problems that have nothing to do with the canner. Namely, things were bubbling up and getting in the seal or bad lids.
Once the jars are cooled, and you’ve checked the seals, remove the canning rings and store them on the pantry shelf. (Store any unsealed jars in the refrigerator for immediate use.)
You’ve run through your first round with an electric pressure canner, and it’s not all that different from stovetop canning. The main benefits here are that it walked you through every step, so you can’t miss anything.
Waterbath Canning in an Electric Pressure Canner
You can also water bath can in an electric pressure canner, and the process is very similar. All you do is select the “water bath canning” setting and then follow the prompts.
The main difference here is that you never put on the pressure regulator, so the chamber doesn’t come up to pressure. You’re still going to prewarm the jars, load the food, put on the lid, and process the jars in the chamber. It’ll just be boiling water instead of pressurized.
The video below walks you through every step of the process:
Electric Pressure Canner FAQ
Hopefully, I’ve covered everything you need to know about electric pressure canners already, but here are some of the most frequently asked questions:
Are Electric Pressure Canners any Good?
Yes, electric pressure canners are great! I’ve been canning for more than a decade, and I’ve used jut about every type of pressure canner on the market, and I absolutely love the Presto Electric Pressure Canner.
Is there a USDA-approved Electric Pressure Canner?
The USDA does not specifically test or approve pressure canners for home use. They do, however, put out guidelines that state what temperatures and/or pressures would be required to process foods safely.
According to the Presto Canning Website, the Presto Precise Digital Pressure Canner meets the guidelines put out by the USDA.
When were electric pressure canners invented?
The first electric pressure canner was released in June 2020, but there was so much turmoil in that year, most home canners still don’t know they exist several years later.
What is the difference between an electric pressure canner and an electric pressure cooker?
An electric pressure canner maintains precise temperatures to ensure that food is processed according to USDA food safety guidelines.
An electric pressure cooker, on the other hand, does not need to maintain any specific pressure to cook food. They generally operate in a pressure range that can vary by 3 to 5 psi at any time while it’s running. They often drop below the minimum safe pressure for canning food, which isn’t a big deal if you’re pressure cooking food for dinner, but it can be catastrophic if pressure canning.
Pressure cookers also do not adjust for altitude, but electric pressure canners do in order to ensure safe processing.
Does a Digital Pressure Canner come with a warranty?
The presto canner comes with a 1-year warranty.
How Long Do Digital Pressure Canners Last?
Since they’re relatively new, no one really knows how long an electric pressure canner should last.
Generally, instant pots are rated for 3-5 years of use. Our instant pot is currently 7 years old, and we’re heavy users. I would guess a digital pressure canner would have a similar lifespan, but it’s hard to know since they’re relatively new.
Keep in mind, if you’re looking for something that lasts a lifetime and you’ll be able to hand down to your kids, go with an All-American Brand Pressure Canner. No electronic appliance, especially not a computerized one, will last a lifetime.
What is the Best Electric Pressure Canner to Buy?
As of April 2023, there are two electric pressure canners on the market that meet the guidelines put out by the USDA. They are:
I have both models, but at this point I only recommend the Presto because it’s much easlier to use. Even as an experienced canner, I have had a number of errors with the Carey that resulted in potentially under processed food. I would love to have a more economical option to reccomend, but at this point, if you’re looking for an electric pressure canner the Presto Precise Digital Pressure Canner is by far the best option.
If you do want something more economical, I would suggest opting for a stovetop canner, as they are the most economical and more dependable in my experience than the Nesco/Carey electric version.
Canning Guides and Reviews
Looking for more canning guides and information?
- Beginner’s Guide to Pressure Canning
- Can you Can in an Instant Pot?
- Presto Precise Digital Pressure Canner Review
- What is Canning Salt? (And Substitutions)
Pressure Canning Recipes
Fill your pressure canner again with these simple pressure canning recipes:

Hi there! I just pressure canned spaghetti meat sauce in quart jars…one site said 75 min and another said 90. Now that it’s done at 75 min. Can I repressure can for 15 min in the digital pressure canner and how?
You can’t just re-can for 15 minutes, the idea is that it’s a continious process time because it takes that long for the center of the jars to reach the appropriate temperature. Generally, meat sauce is 75 minutes for pints, and 90 minutes for quarts. If you’re canning in pints, you should be ok. If you’re canning in quarts, you’ll either need to re-process for the whole time or just store in the refrigerator or freezer for short term use.
Oh…I just re-read and saw you did it in quarts =(
My friends have just purchased a new electric canner. They are not able to advance the timer past 2 minutes. Any idea of problem?
Yeah, it sounds like you got a lemon there and I’d send it back. It’s easy to advance the time and there’s no trick to it, if the machine is working properly.
Thank you so much Ashley for this incredible article and all the valuable information.
I used an All American Dial Gauge canner in the past and loved it as I did a lot of canning and now my canning needs have changed and the Presto Electric Canner would be perfect for me!!!
I certainly appreciate the well explained instructions on it’s use as well as all the wonderful recipes you provide.
Sincerely,
Leona
So glad it’s helpful to you!
Is there ever a time you would turn the pressure regulator to Vent”?
Not that I can think of, unless maybe you make a mistake and needed to end the canning process early for some reason. Even then, I’d just let it depressurize naturally. Maybe someone else can think of a situation that’d you’d need that, but I can’t.
I am canning chicken broth. Can I do a quick release after the canning process is done or do you have to wait for the cool down period for the food to be safe?
You cannot do quick release when canning. That’s the same when using a digital canner or a regular canner. Not only can it potentially break the jars, but it’s also that the cool down time is part of the preservation time. It needs to cool slowly to be fully processed.
Can I use my own recipes in the presto electric canner?
You safely use recipes that are tested for pressure canning, and if your recipes follow safe pressure canning guidance, then yes. It really depends on your recipes.
I have a Presto Electric canner and I can’t get it to go past 120 minutes on the waterbath option.
Is there something else I need to do?
I think the timer maxes out at 120 minutes (as there’s nothing that the USDA processes longer than that). I know there are some non USDA processes that do use that option, but the canner isn’t really designed with those in mind.
I got the Presto Electeic canner. How long after venting does it take for the lock to pop up? Mine seems to run for a long time and doesn’t pop up. Am I putting too much water ( I used 3 qt jars and it was to the fill line.)? Any suggestions? I have the same issue with my stove top.
I didn’t time it, but it was quite quick. It should lock closed and proceed in 10 minutes or less. If it’s not working, I’m honestly not sure what the problem might be.
Can this also be used as a pressure cooker only a canner?
Possibly, but it’s really not setup for that. You have to do all the pre-warming jars steps and that’d be awkward if you’re cooking a meal or something like that. I doubt the vent is really setup to accommodate cooking directly in the pot either, so I wouldn’t recommend it.
I just started using the Presto Electric Canner and absolutely love it! It came with a pretty limited recipe book. Can I use any of your pressure canning recipes in the electric canner? I want to be able to put up soup, stews and chili too.
Yes, you can use any pressure canning recipe, and all of mine are great for the Presto. If you’re looking for a pressure canning book, Angi Schneider’s book is great, and the All New Ball Book of Home canning has a lot of great pressure canning recipes as well.
Great article on electric pressure canners! I learned a lot about their benefits and features. Thanks for sharing this valuable information.