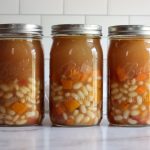
Canning White bean Soup with Butternut Squash
Butternut squash pairs perfectly with white beans in this savory, comforting home canned soup recipe.
Ingredients
- 2 lbs 907 g peeled, cubed, and de-seeded butternut squash (cut into 1-inch or 2.5 cm cubes)
- ¾ lbs 339 g dried cannellini beans, presoaked
- 2 tbsp 30 ml olive oil
- 2 cups 320 g chopped yellow onions
- 1 cup 128 grams diced carrots
- 6 cups 1.4 L chicken or vegetable broth
- 5 cups 1.3 kg peeled and crushed tomatoes
- 4 cloves garlic minced
- 1 tbsp 15 ml apple cider vinegar
- 1 tbsp 18 g non iodized salt
- 1 tsp dried thyme
Instructions
- Prepare the pressure canner, jars, and lids. You will need eight 1-pint jars or four 1-quart jars. Fill your canner with a few inches (about 8 cm) of water, depending on the instructions from your manufacturer, and place the canner on the stovetop over low heat with the jars inside to keep them hot. Heat the water to about 180 degrees Fahrenheit (82 degrees Celsius).
- Put the oven on the broil setting, then coat the butternut squash cubes in oil and spread them on a baking sheet.
- Broil the cubes in the oven until they are fully browned. This will take around five minutes.
- Drain the water from the beans you soaked. Place them in a large stockpot and cover them with fresh water, then bring the beans to a boil.
- Remove from the heat and drain the water.
- Put the beans back in the stockpot on the stove. Add the roasted butternut squash cubes, along with the onions, carrots, broth, tomatoes, vinegar, spices, and garlic.
- Bring the mixture to a boil over high heat, then reduce it to a gentler boil for about five minutes.
- Take the stockpot off the heat. Then, ladle the soup into jars, putting the solids in evenly and using a bubble removal tool to get rid of any bubbles.
- Check for headspace, aiming for about 1 inch (2.5 cm) of headspace.
- If you find yourself short on liquid, add boiling water or hot chicken or vegetable broth.
- Before putting the lids on the jars, wipe the rims with a clean, damp cloth. Place the bands and lids on the jars and load them into the pressure canner.
- Process the jars at 10 lbs of pressure for 75 minutes (69 kPa) for 1-pint jars and 90 minutes for 1 quart jars. Adjust for altitude or for your manufacturer's instructions if necessary.
- When the time has elapsed, turn the heat off and allow the canner to depressurize on its own. Then, remove the jars and allow them to cool for 12 hours before storing.
Notes
For Serving (Optional):
- ¼ cup (60 ml) heavy cream
- Chopped green onions or chives
Altitude Adjustments for Canning Soup
With pressure canning, the processing times stay the same at higher altitudes, but the pressures change. Here are the altitude adjustments for pressure canning soup:For dial gauge pressure canners:
- 0 to 2,000 feet in elevation – 11 lbs pressure
- 2,001 to 4,000 feet in elevation – 12 lbs pressure
- 4,001 to 6,000 feet in elevation – 13 lbs pressure
- 6,001 to 8,000 feet in elevation – 14 lbs pressure
For weighted gauge pressure canners:
- 0 to 1,000 feet in elevation – 10 lbs pressure
- Above 1,000 feet – 15 lbs pressure